Bobbin Tension Chart
Bobbin Tension Chart - Polyester thread and the bobbin thread is a fine, 60 wt. Web is your bobbin thread showing on the top side of your fabric? Web the illustration below shows both the top and underside of four identical circles, all stitched with different bobbin tension settings. Web if you’re having trouble with your stitches looking uneven, the chances are that your bobbin tension is not set correctly. Web we have a video that shows these 6 steps to perfect tension. Sewing machine tension devices place stress on the upper and lower thread to hold them taunt for precise stitching. Are your stitches just looking wonky and not very strong or even? A clean bobbin case is essential for proper tension settings. The towa bobbin gauge tension numbers are measured with superbobs. Set it, put the bobbin case into your machine, and forget it. Find the screw for tension settings. Let’s talk about how to check to see if it is and how to fix bobbin tension on your sewing machine. Web bobbin tensions should be 18 to 22 grams (up to 25 grams when embroidering caps). Sewing machine tension devices place stress on the upper and lower thread to hold them taunt for precise stitching. Learn to adjust the bobbin tension for your sewing projects. Proper tensions for satin stitches should reveal 1/3 bobbin and 2/3 top thread color on the underside of the embroidery as seen on the image above. Using the towa bobbin gauge in your longarm quilting routine will save you time and help you. Web in this sewing tutorial i'll tell you everything i know about the bobbin tension. It is a simple circle comprising a fill stitch centre with a 3mm satin stitch border, about the size of a $1 coin. Follow the video to learn the “drop” test to set your bobbin tension. The bobbin tension used for each circle is shown in grams. Web if you’re having trouble with your stitches looking uneven, the chances are that your bobbin tension is not set correctly. Sounds like your sewing machine tension is out of whack or your bobbin is behaving badly! Essentially, the metal case you put the bobbin in before you load. Web the bobbin tension is only a part of the sewing machine tension and must work in conjunction with the needle tension. To obtain the correct tension setting, perform a test with the fabric and thread you plan to use for your Find the screw for tension settings. Web if you’re having trouble with your stitches looking uneven, the chances. If the top thread is a thick, 30 wt. Sewing machine tension devices place stress on the upper and lower thread to hold them taunt for precise stitching. The towa bobbin gauge tension numbers are measured with superbobs. Web the towa bobbin tension gauge puts a numerical value to the amount of tension placed on a bobbin. Proper tensions for. It is a simple circle comprising a fill stitch centre with a 3mm satin stitch border, about the size of a $1 coin. Essentially, the metal case you put the bobbin in before you load the whole thing in your machine has a tiny screw on the side. Are your stitches just looking wonky and not very strong or even?. It is a simple circle comprising a fill stitch centre with a 3mm satin stitch border, about the size of a $1 coin. Top thread showing up on the underside + the bobbin thread stays straight = upper t is too loose. The towa bobbin gauge tension numbers are measured with superbobs. Using the towa bobbin gauge in your longarm. If the top thread is a thick, 30 wt. This is very helpful as it allows you to quantify the amount of tension placed on a bobbin thread, so you have a benchmark to base bobbin tension. Bobbin tension (otherwise called bottom tension) is usually set at a factory for all standard sewing threads. When your tensions are correct, you. Bobbin thread showing up on the top side + the top thread stays straight = upper t is too tight. Essentially, the metal case you put the bobbin in before you load the whole thing in your machine has a tiny screw on the side. Bob purcell (chief threadologist of superior threads) discusses when adjusting the tension on a bobbin. Web the thickness and material of the top thread can affect stitch quality and stitch balance. Web you can adjust the bobbin tension in your sewing machine by turning the tension spring screw in the bobbin case to the right to tighten the tension and to the left to loosen tension. Web the illustration below shows both the top and. The upper thread uses a set of discs to hold the thread tense. Find the screw for tension settings. Web bobbin tensions should be 18 to 22 grams (up to 25 grams when embroidering caps). Web longarm thread tension guide for top and bottom threads (for handi quilter machines) *we use superbobs prewound bobbins in our longarm machines. Web the. Web the illustration below shows both the top and underside of four identical circles, all stitched with different bobbin tension settings. Sounds like your sewing machine tension is out of whack or your bobbin is behaving badly! You would not need any adjustment for a greater part of your journey. Find the screw for tension settings. Web the thickness and. Proper tensions for satin stitches should reveal 1/3 bobbin and 2/3 top thread color on the underside of the embroidery as seen on the image above. Follow the video to learn the “drop” test to set your bobbin tension. Sounds like your sewing machine tension is out of whack or your bobbin is behaving badly! Essentially, the metal case you put the bobbin in before you load the whole thing in your machine has a tiny screw on the side. To obtain the correct tension setting, perform a test with the fabric and thread you plan to use for your Cotton thread, the top tension will most likely need to be adjusted (loosened) to accommodate an even stitch. The towa bobbin gauge tension numbers are measured with superbobs. Bobbin thread showing up on the top side + the top thread stays straight = upper t is too tight. Bob purcell (chief threadologist of superior threads) discusses when adjusting the tension on a bobbin case is necessary. A clean bobbin case is essential for proper tension settings. Web we used our superbobs prewound bobbins in our towa to determine the optimal tension number (settings). Bobbin tension (otherwise called bottom tension) is usually set at a factory for all standard sewing threads. This is very helpful as it allows you to quantify the amount of tension placed on a bobbin thread, so you have a benchmark to base bobbin tension. Web is your bobbin thread showing on the top side of your fabric? Web if you’re having trouble with your stitches looking uneven, the chances are that your bobbin tension is not set correctly. When your tensions are correct, you will see three fairly evenly divided sections on the back of your lettering or embroidery in each segment.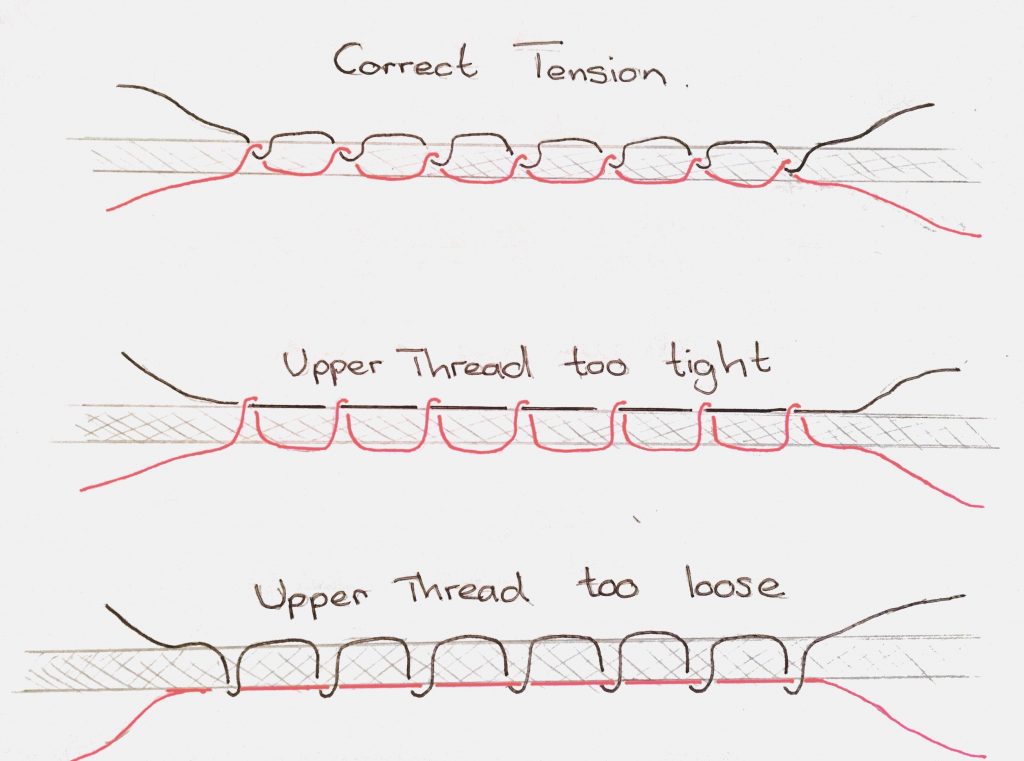
UNDERSTANDING THREAD TENSION ON YOUR SEWING MACHINE

Towa Tension Gauge Chart

How to Use a Towa Bobbin Tension Gauge EMBROIDERYPRO

Sewing Machine Tension Numbers

Towa Tension Gauge Chart
Sewing Lesson 10 How to Fix Tension on Your Sewing Machine Oh You

Sewing machine tension guide everything you need to know about the

How To Adjust Bobbin Tension On Singer Fashion Mate Jonster
Bobbin Style Guide The Thread Exchange

Sewing Machine Tension Chart
By Doing So, You’ll Be Able To Sew Beautiful, Even Stitches Every Time.
Simply Turning The Tension Screw On A Bobbin Case A.
Web Bobbin Tensions Should Be 18 To 22 Grams (Up To 25 Grams When Embroidering Caps).
If The Top Thread Is A Thick, 30 Wt.
Related Post:
